TMC and vSphere with Tanzu
Provision and Manage your Tanzu Kubernetes Clusters with TMC
With the recent enhancement Tanzu Mission Control provides an integration between the Tanzu Kubernetes Grid Service running on vSphere 7 and the centralized control plane “Tanzu Mission Control” running on VMware Cloud. With the new update of Tanzu Mission Control it is possible to register an existing vSphere Supervisor Cluster in TMC which enables you to provision and lifecycle new Kubernetes Clusters from TMC directly. Further support for VMware Cloud on AWS and Azure is on the roadmap and should be available soon. Right now you can still manage those Clusters with Tanzu Mission Control by attaching them. The process is described here.
To follow this tutorial you will need:
- A vSphere with Tanzu Environment
- Access to Tanzu Mission Control
- An espresso or a glass of red wine ;)
I provisioned my vSphere with Tanzu Lab based on the Article from my colleague William Lam. The article provides a link to his github repo and really helps you to ramp up a vSphere with Tanzu lab with minimum resources and effort. If you have an existing VMware Cloud organization you can request access to TMC directly from the console. If not please reach out to VMware in order to request the activation.
First we logon to Tanzu Mission Control and register our vSphere Supervisor Cluster
Navigate to Administration > Management Clusters and then click on the Register Management Cluster button in the TMC-UI.
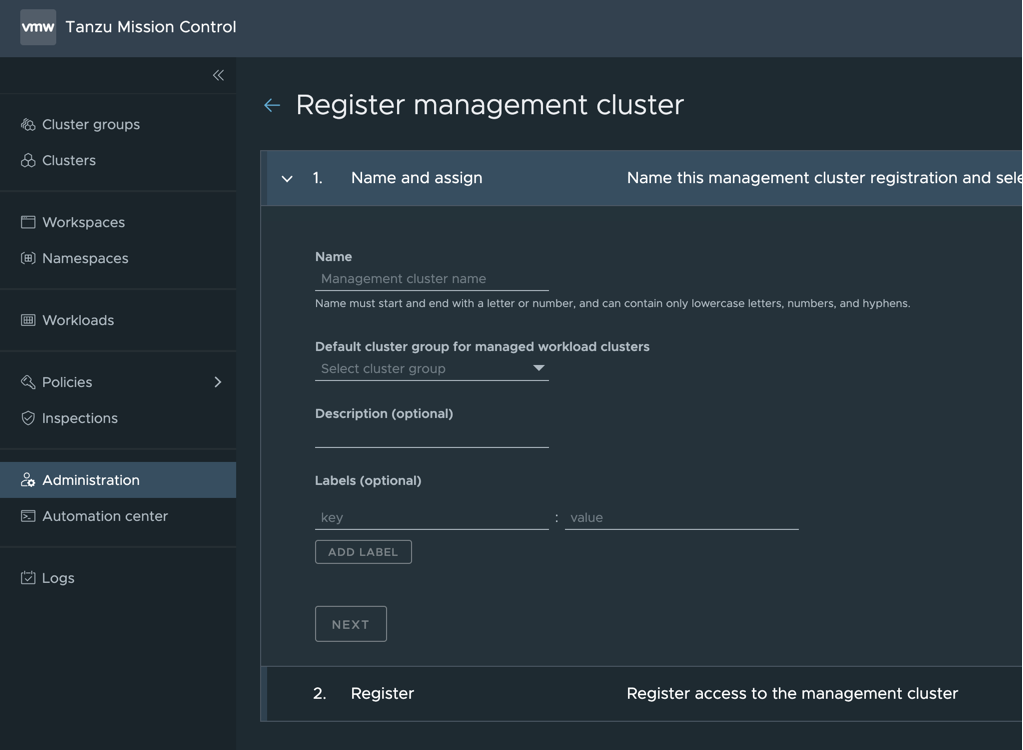
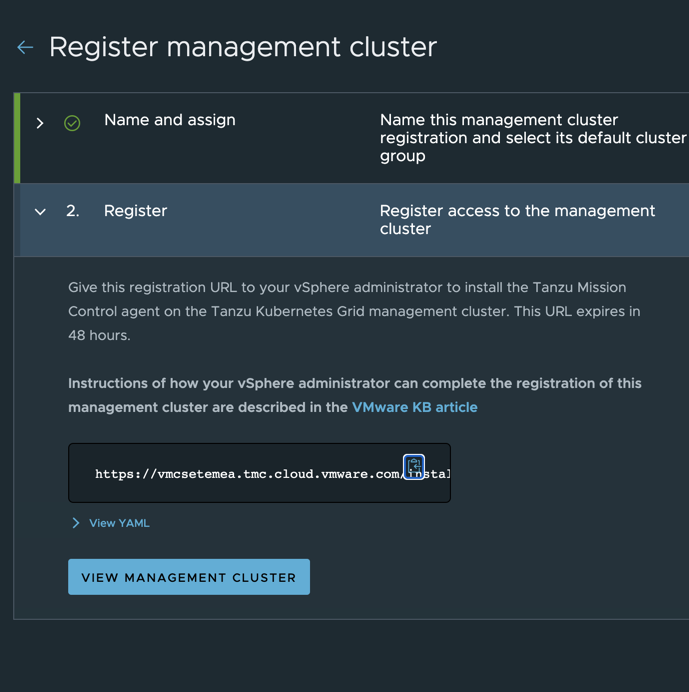
On the Register pane, copy the provided registration URL
Prepare the vSphere with Tanzu Environment
Next we need to login to our Supervisor Cluster
My Supervisor Cluster Endpoint IP is “10.10.0.64” and my vSphere Namespace is “adess1”.
# login to the Supervisor Cluster
$ kubectl-vsphere login --vsphere-username administrator@vsphere.local --server=10.10.0.64 --insecure-skip-tls-verify

# Setting the context
$ kubectl config use-context adess1

# checking for the tmc-namespace
$ k get ns | grep tmc
svc-tmc-c8                                  Active
Register the Agent
We need to register our Supervisor Cluster on TMC and we will achieve this by installing the neccessary agents on it. Therefore we are going to create a file called “registration.yaml” which will take care about the agent install. Replace the values for your namespace which is “svc-tmc-c8” and “registrationLink” which is “https://vmcsetemea.tmc.cloud.vmware.com/installer?id=8fa6dd346a62a25cc64aa82ec49caef652995c9925c3a6b26b8b9261d626a2d5&source=registration" in my example with your values. For additional configuration please have a look at the official VMware KB.
$ cat registration.yaml
apiVersion: installers.tmc.cloud.vmware.com/v1alpha1
kind: AgentInstall
metadata:
  name: tmc-agent-installer-config
  namespace: svc-tmc-c8
spec:
  operation: INSTALL
  registrationLink: https://vmcsetemea.tmc.cloud.vmware.com/installer?id=8fa6dd346a62a25cc64aa82ec49caef652995c9925c3a6b26b8b9261d626a2d5&source=registration
Apply the registration file on your Cluster:
$ k apply -f registration.yaml
agentinstall.installers.tmc.cloud.vmware.com/tmc-agent-installer-config created
Wait till the following command outputs the status “INSTALLED”:
$ kubectl -n svc-tmc-c8 describe agentinstall tmc-agent-installer-config
Manager:         tmc-agent-installer
...
...
  Operation:          INSTALL
  Registration Link:  https://vmcsetemea.tmc.cloud.vmware.com/installer?id=8fa6dd346a62a25cc64aa82ec49caef652995c9925c3a6b26b8b9261d626a2d5&source=registration
Status:
  Message:  successfully applied the registration link
  Status:   INSTALLED
Events:     <none>
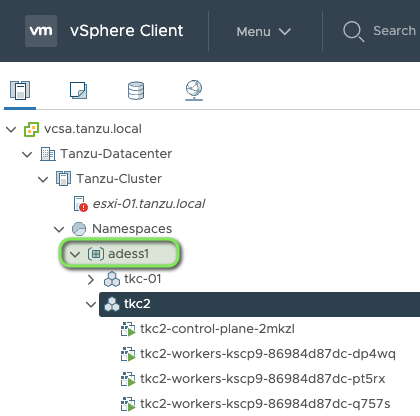
After this is complete you should be able to see the vSphere Supervisor Cluster registered in Tanzu Mission Control as well:
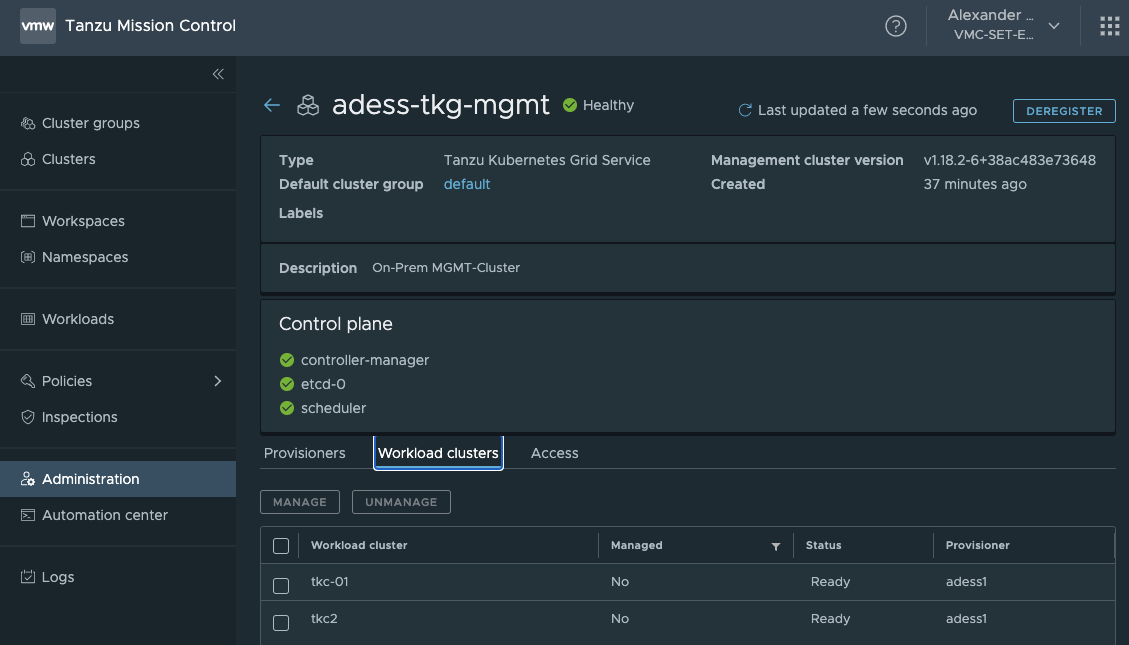
We have successfully registered our vSphere Supervisor Cluster with Tanzu Mission Control. We see that our Workload Clusters which are already provisioned have been discovered. From now on we can leverage Tanzu Mission Control to deploy new Tanzu Kubernetes Clusters on our On Prem vSphere Environment.
Create a Tanzu Kubernetes Cluster from Tanzu Mission Control
From now on we can create Clusters from Tanzu Mission Control on our vSphere with Tanzu enabled Cluster.
When you go back to “Clusters” and hit the “CREATE CLUSTER” button you will notice, that there is a new option to create Clusters now on our vSphere based TKGs Environment.
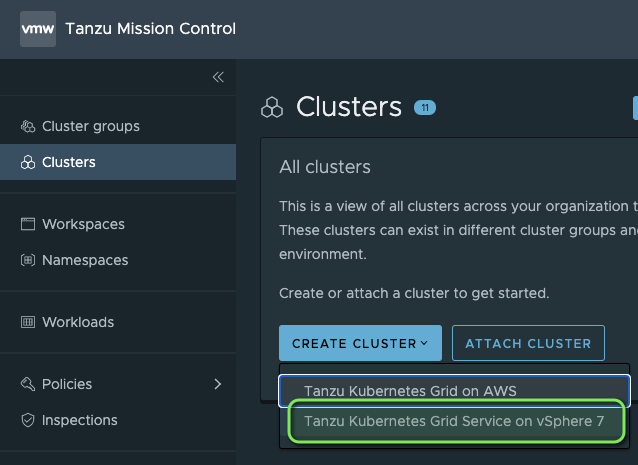
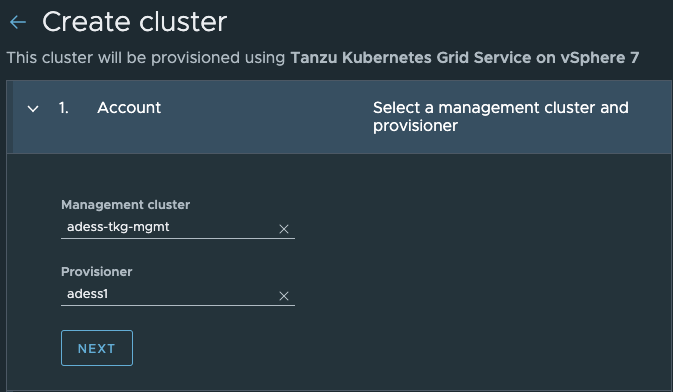
We are going to create a new Cluster called “tmc-tkg” and first we need to select our Supervisor Cluster and the corresponding Namespace:
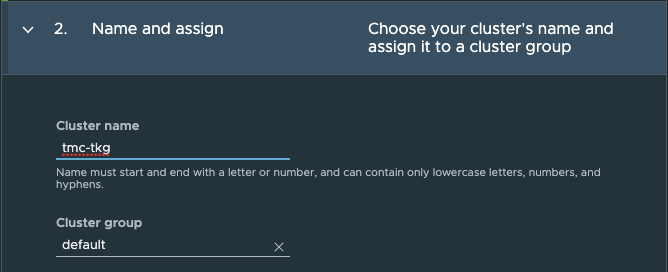
Next we will assign a Cluster name and attach it to a Cluster Group. If you want to learn more about Cluster Groups and Namespaces I recommend to checkout my previous post about Tanzu Mission Control.
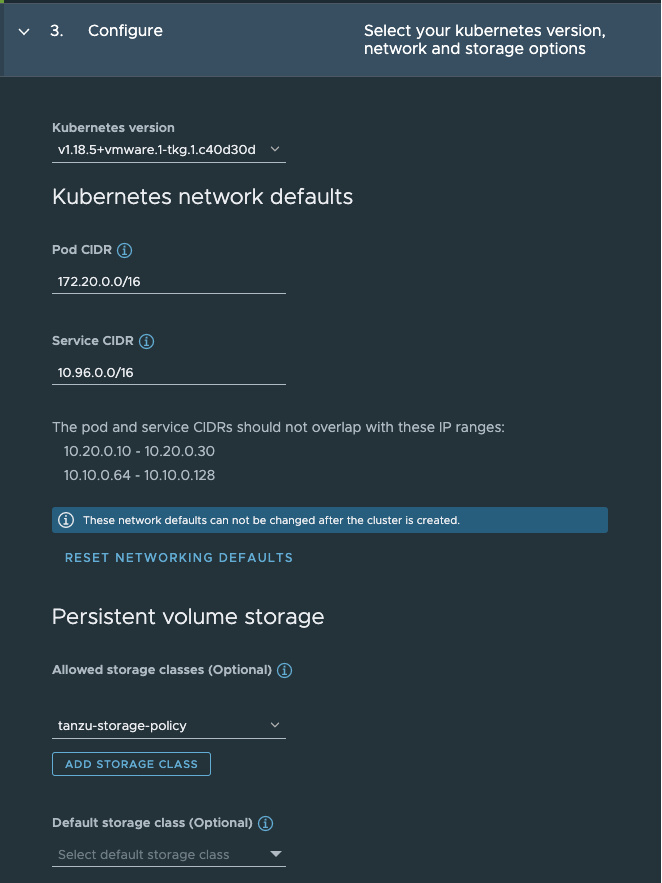
In the configuration step we can select our K8s Version, CIDR-Ranges and the Storage classes which we want to use. You can also select a default storage class in case you are working with multiple storage classes in your environment.
In Step 4 we can select our Control Plane instance types and whether we want a highly available Production or a single node control plane for a Development Cluster.
This equals the “Virtual Machine Class” which you can set when deploying a Tanzu Kubernetes Cluster in the yaml file. For more insights regarding machine classes please have a look here.

In Step 5 we can select our Worker instance types and the Storage class which we want to use.
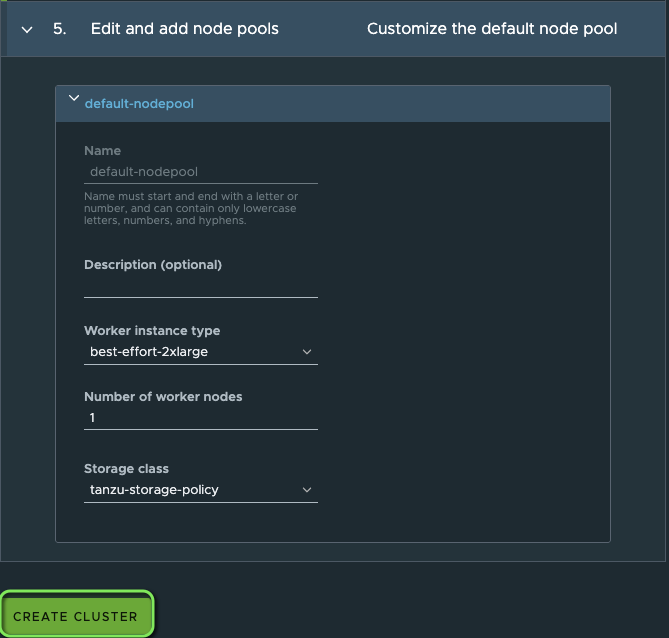
That´s it. Let´s hit the “CREATE CLUSTER” Button and wait for the provisioning to happen.
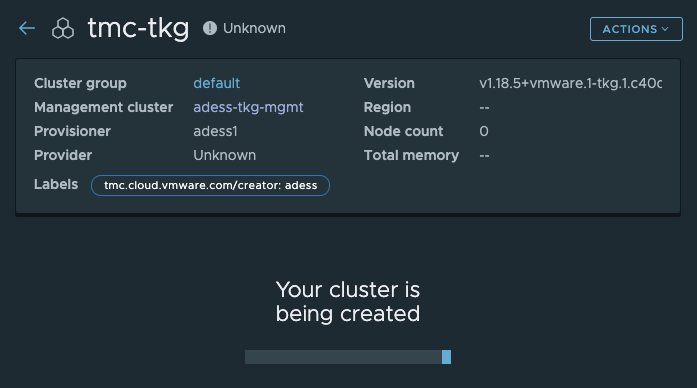
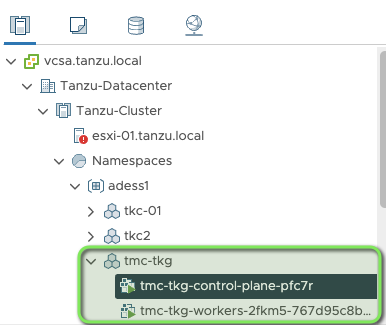
Provisioning starts seconds later in our vSphere with Tanzu Environment:
After the provisioning is finsihed we see that our Cluster is healthy in TMC and we can now logon to the new cluster. Hit the button “Actions” and select “Access this cluster” to retreive the kubeconfig.

A huge improvement is the integration with IAM when you provision a Cluster from TMC. We are now able to retrieve the corresponding kubeconfig file directly from Tanzu Mission Control which makes it easier for different teams to gain access to this Cluster.
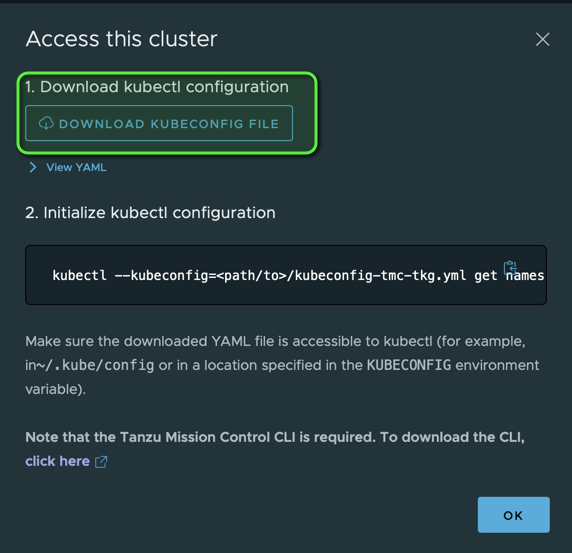
I have downloaded the kubeconfig file which contains the secret and can now use it to interact with the provisioned Cluster:
$ kubectl --kubeconfig=/Users/adess/Downloads/kubeconfig-tmc-tkg.yml get namespaces
NAME                           STATUS   AGE
default                        Active   147m
kube-node-lease                Active   147m
kube-public                    Active   147m
kube-system                    Active   147m
vmware-system-auth             Active   147m
vmware-system-cloud-provider   Active   147m
vmware-system-csi              Active   147m
vmware-system-tmc              Active   147m
If you are working with the kubectl-vsphere plugin you can still use the vsphere-kubectl like for any other Tanzu Kubernetes Cluster on vSphere to authenticate.
Below I am running the authentication process via the kubectl-vsphere plugin and execute the exact same command as with the retrieved kubeconfig from above. Logically the output is exactly the same.
$ kubectl-vsphere login --vsphere-username administrator@vsphere.local --server=10.10.0.64 --insecure-skip-tls-verify --tanzu-kubernetes-cluster-name tmc-tkg --tanzu-kubernetes-cluster-namespace adess1

$ kubectl get namespaces
NAME                           STATUS   AGE
default                        Active   149m
kube-node-lease                Active   149m
kube-public                    Active   149m
kube-system                    Active   149m
vmware-system-auth             Active   149m
vmware-system-cloud-provider   Active   149m
vmware-system-csi              Active   149m
vmware-system-tmc              Active   149m
I am impressed how easy and straight forward this was to implement. TMC provides a centralized control plane for all Kubernetes Clusters running in the Cloud or On Premises and a graphical interface to provision and manage all your Clusters. Right now we see that TMC really helps to keep an easy and streamlined appraoch to enable Development teams in gaining more flexibility while ensuring a safe and secure environment applied by policies of the operators. I am really excited what´s coming next :-)!
As usual feedback is welcome and feel free to reach out in case you found errors or have suggestions.
Links: